I am coming out of a creative block after spending a very strange month.
Not only have I been out of my comfort zone for most of it, but I also felt
the least productive I’ve felt in a while. I felt useless. Not “useless” in a
hopeless kind of way, but more in the “what am I supposed to do with my free
time?” kind of way. Let me explain.
First of all, I left my job in late March in what I would consider an emotional
departure. My teammates and I were close, so I couldn’t be super objective
about the best way to say goodbye or how to be useful on my last days. Other
than the known meetings and rituals, I blanked for most of it.
After that, I had a couple of weeks of vacation, most of which I spent visiting
family I hadn’t seen in years. I blanked for most of it, except I tried to
lower my guard a bit. This guard was difficult to piece together but it all put
an emphasis on a troublesome truth: I defined myself around productivity. This
is a truth that I suspected before and wasn’t ready to confront.
The past few years I’ve inequivocally defined my “happiness” around my career.
The problem with this (other than the obvious) is that this narrowed down my
world-view. Any excitement or plan for the future was shaped around growing
professionally. Everything else was a distraction. This limited my entertainment
choices to TV, dinners and video games. Even in the context of having a few
weeks off, I still asked myself “okay, but at time during the day can I work
on one of my projects?.”
My guard eventually did come down. Not because I wanted to, but because it had
to. The unfamiliar places combined with estranged family gave me the sense of
adventure that I didn’t know I need. Everything felt alien, but with the right
amount of comfort. I had no choice but to go with the flow.
Being relaxed both physically and mentally made me more likely to want
to go back to feeling that way. This meant I cared less about the unknown, as I
realized I had no control over it. And the more that I realized the unknown had
no power over me, the more I started to seek it.
How do you know what you want to do with your life? Can it really just be one thing? Chances are you have many interests between topics, skills, or activities. You wish you had all the time in the world to engage in all of them, and yet, you hope that eventually this will show you a “passion”.
When I was in my early teens I drew pirate ships or cars every day after school, I also made incomplete board game concepts that helped me understand the process of making more complex products. I then played with animation. First with stop-motion using play doh and later digital 2d in Flash. This digital turning point allowed me to play with the scripting language in Flash, or create websites. I later tried Dreamweaver, which exposed me to a more utilitarian way of creating visual and interactive experiences. Turns out this was a skill that was in high demand, so my career in the web was born.
This exploration of different skills and mediums helped me find a profitable profession, but sometimes I feel as though it all happened too fast. As if I didn’t get to “really try” my other interests like I did the web. Am I missing out? Is it too late to change course?
Those two questions, the last one in particular, are a bit absolute. They imply I can’t engage in my other interests without fully committing which is kinda ironic, considering that I got into web development by not fully committing to anything initially. My commitments were to reach a natural stopping point. I didn’t create masterpieces, but I had fun. It could’ve led to nothing and I would’ve still enjoyed them.
The resounding pressure to do something great shows every time I see what others do and wonder if I can bring a unique perspective. But that’s where the difference between trying and really trying is important. Trying means something about the activity or topic caught my attention and my curiosity cannot be silenced. Really trying means I’m ready to take the next step. Whatever that next step means.
A recent idea that I’m just beginning to accept is the fact that it’s okay to
make decisions on a “gut feeling” and finding logical reasons for them later.
I mean, that’s the definition of intuition.
While it may seem like common sense, it may be a bit more difficult if you’re
obsessed with “truth” and you feel like you have to make an informed decision
or otherwise you’ll label yourself “impulsive”. I know I do.
I’ve wanted to have a blog since my teens, and I’ve had quite a few iterations.
None of which had volume nor consistency. One common pattern, though: I always
felt as if they had to have a brand, a theme, or even a subject. I felt as if I
needed to pick an audience.
It was honestly exhausting—all I wanted was to express myself publicly. I wanted
to write about whatever I wanted, but then “the blog would be too wide, nobody
would be able to relate.” If I didn’t brand the blog then it would be named after
my name, and my name is not catchy, “who’s going to remember to go to
rolandomurillo.com?” However, if I picked a name/logo I was putting too much
pressure on myself to produce something worth reading.
Some people write publicly because they are hoping to teach the world something.
Or use it for accountability and to force themselves to learn something and share
it. Others see it as a viable business. Everyone’s got their logical reason.
I actually don’t know why I want to make a blog. I hope that people find my posts
and find them helpful in whatever capacity, yes. But I’m not really at a point
where I can deliver predictably to develop an audience.
I decided that’s not going to stop me from wanting to express myself publicly in a
written form with some level of consistency. And, in a way, I’m accepting myself
by not having a specific blog with a cool name or brand.
My relationship with hand-written notes has been spotty. If I have a notepad next to me, I’m very likely to doodle, take notes and write down my thoughts. If I don’t, I’ll just go back to taking notes wherever makes sense on my computer or phone.
Lately, I’ve been using sharpies and watercolor paper for quick sketches for Bleep and it’s been quite enjoyable: the thick lines of a marker feels faster and less serious than drawing. The frustrating part is that watercolor grade stationary and sharpies are bulky and hard to travel with. Also, making sketches really made me miss the tiny journalist-style Moleskine for regular notes, which would mean carrying a different stationary setup and not being able to combine the two. So I decided to purchase a trendy e-ink tablet that allows you to read, write and sketch on the same device.
The marketing will tell you that it helps you focus and maybe there is some truth to that, but my main reason for wanting an e-ink device (vs. iPad) was that I wanted paper, I didn’t want another screen to look at. The way the light blends into the surface of the device feels the most natural and less intrusive (you know, like a piece of paper) yet I have the advantage of organizing my notes and sketches by project or intent without having to carry multiple notebooks, writing or sketching tools.
It’s certainly a luxury, but I really just love the freedom of having a hybrid analog and digital knowledge base without having to think about it. The last time I had an e-ink device was the two times that I bought a Kindle, read a couple of books and then gifted it to someone. Back then, the technology was good enough for reading but I didn’t see myself writing on them. I am now in awe of being able to have a larger device that looks good, feels good and it’s light as hell.
Ironically, I might still get an iPad at some point but mainly for digital art. Until then, praise e-ink!
Not a crazy update. Just I noticed the often underappreciated quality of short films. Will be watching new shorts this week. Some places I’ll be checking out:
In this talk, video game programmer Jonathan Blow speaks of the sometimes
unnecessary complexity that comes with writing software. Systems that would
initially be well understood (e.g. a single person can read and change them) are
now split in different services and abstractions that are harder to inherit and
could eventually lose meaning (the collapse of civilization).
I’m a bit more optimistic, but he does give a worrisome example (paraphrasing):
As video game engines such as Unity continue to gain popularity and custom
engines become a rarity, will there be anyone who knows how to write them 50
years from now? Will anyone still be around to understand Unity itself?
When it comes to taking advantage of your larger displays, having a tool that helps you split and arrange windows quickly goes a long way. In this guide, I take this concept further by helping you create a workflow where every corner of your screen has a purpose, and apps can be launched and rearranged quickly with keystrokes. All with a dose of beautiful a e s t h e t i c s.
Choosing the right tool
If you don’t have a window management app yet, that’s a good place to start. I will be focusing the guide on Moom but the specific tool doesn’t really matter as long as it supports these killer features:
Grids
Your chosen app should allow you define areas on your screen based on a grid that you can customize to your liking. In my case, I divide my screen in an 8x8 grid for fine-control.
Keyboard shortcuts
Many solutions out there have menus that you can click in order to rearrange windows. This can be convenient at times, but if you’re dealing with large displays, using your mouse for this is going to be time consuming.
Gaps between windows
When running commands to divide or rearrange your windows, you’ll want your window management app to leave some space or gap between them. While it make seem like a subjective aesthetic choice, it will give you some breathing room and better sense of space. Plus it looks good.
Creating a default layout
A default layout is how your windows will be arranged most of the time. You may move them around for certain tasks, but having a layout to default to will keep your workflow consistent. Before we jump to specifics, let’s first answer this question:
What apps do you use the most and what are they used for?
Make sure you group them by category. Order doesn’t matter. This is my answer:
This will depend entirely on your personal preference and hardware situation, but what you generally want to do is grab the apps from above and arrange them in such a way that it matches the time you spend on them and the space they actually need.
Another advice is to keep apps in the same category (such as Slack, Messages and WhatsApp) stacked since you can switch between them easily.
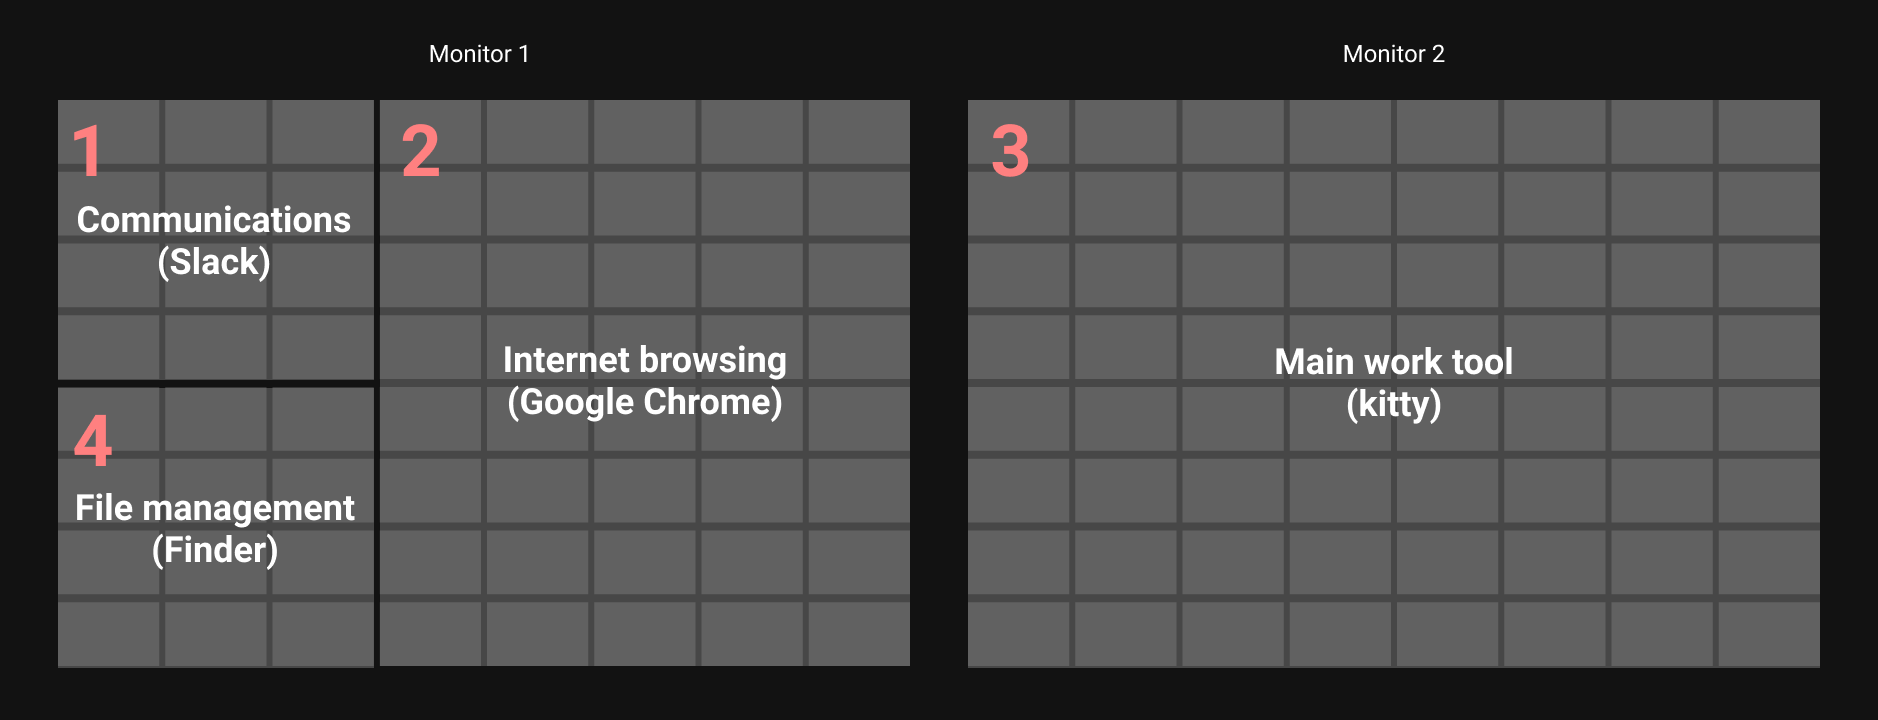
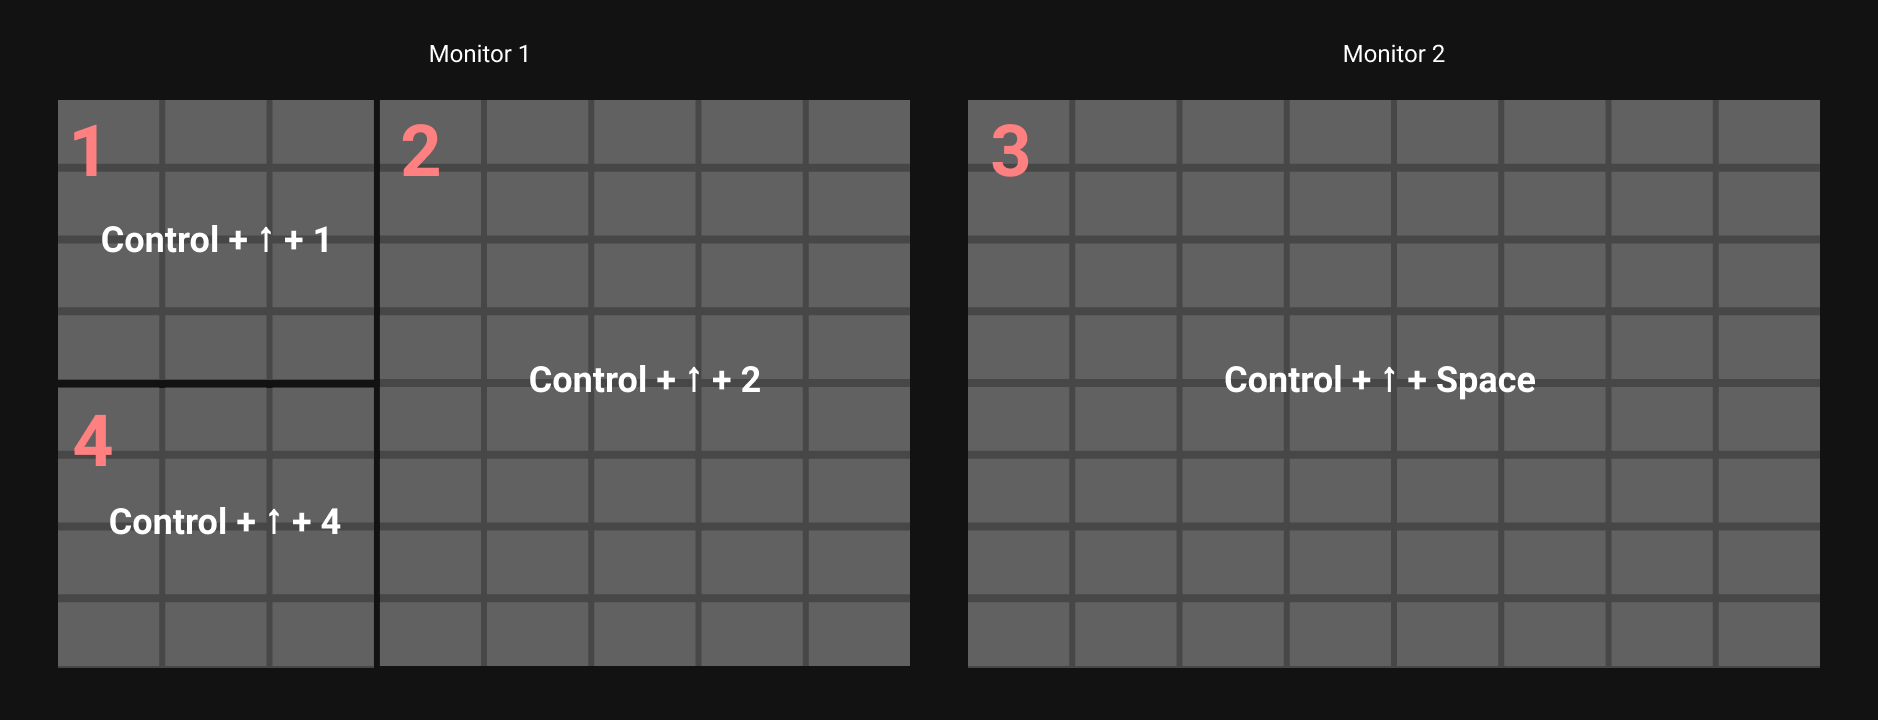
Here’s my layout:
I used a 8x8 grid to help create the right proportion. E.g. I needed my browser to be a bit wider than half the screen.
I have two monitors that are the exact same size. I find that my eyes default more to the right monitor so having my work tool (3) occupy the entire screen there is more ergonomic to me. I need my browser (2) conveniently close for reference or previewing changes, but also general browsing so occupying the majority of the left screen feels right also.
Communications apps (1) are stacked up on the same quadrant on the top left of my setup and I switch to them based on need. That leaves a convenient location for file management (4) on the bottom left.
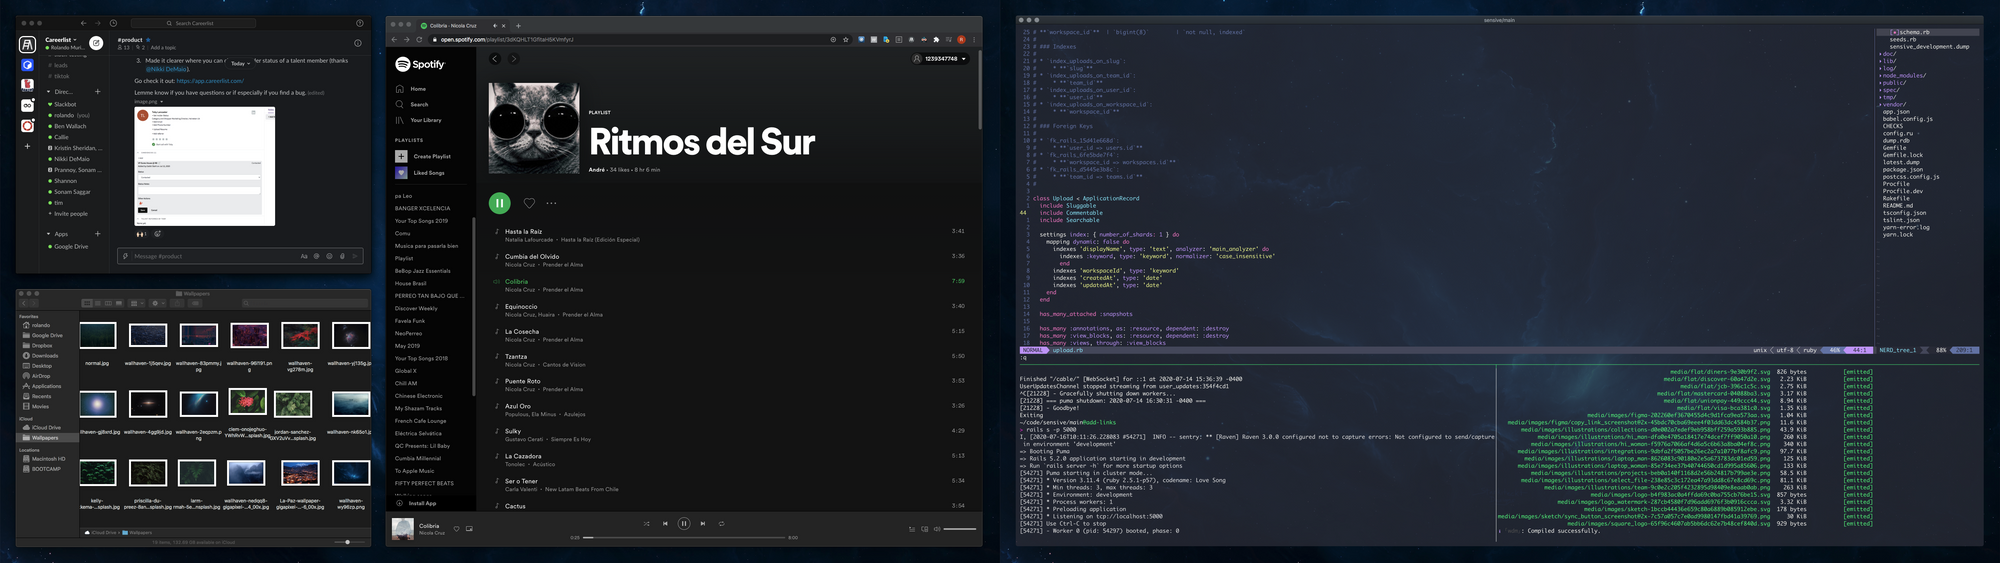
This is a screenshot of how it actually looks:
Click to zoom.
Supercharge with hotkeys
Once you’re satisfied with the layout, it’s time to make it easy to re-create with your window management tool. Moom will let you select a part of your screen and set a keyboard shortcut:
On the top right out of each of these custom settings, I can set a key to use in combination with Moom’s hotkey, which is Control + ↑ in my case. I chose 1 because its the first area from left to right. So, if I want to move Slack or any other communication tool like (Messages) to area 1, I press Control + ↑ + 1.
For area 3, I use Control + ↑ + Space. This is a default hotkey from Moom to occupy the entire screen.
Moom also has a custom setting that saves your window/app arrangement and lets you set up a key for it using the Arrange Windows custom setting:
“Ignore obstructed windows” is checked by default, but I kept it on because I want other communication tools to be moved as well (even if they’re not visible)
In this case, if I want to quickly re-create my entire default layout, all I have to do is press Control + ↑ + D. If something looks off, you can move your windows again (or close apps you don’t want to be affected by this layout) and then click on Update Snapshot to save your changes.
Everyday layouts
Depending on your workflow, you may need to move windows quickly in addition to your default layout.
Side by side layout
Useful when you want to cross reference information or previewing. You probably already use it to some capacity, but here are some hotkeys I use that make that process easier:
Move a window to the left half of the screen: Control + ↑ + ←
Move a window to the right half of the screen: Control + ↑ + →
A setting like Moom’s Arrange Windows also comes handy for this, all you have to do is put the two type of windows you want side by side and set it up:
In this case, I do want to Ignore obstructed windows because I only care about the windows visible.
So the keyboard shortcut for this ends up being Control + ↑ + S. If you use a setting like this, you may need to do it per app/window combination.
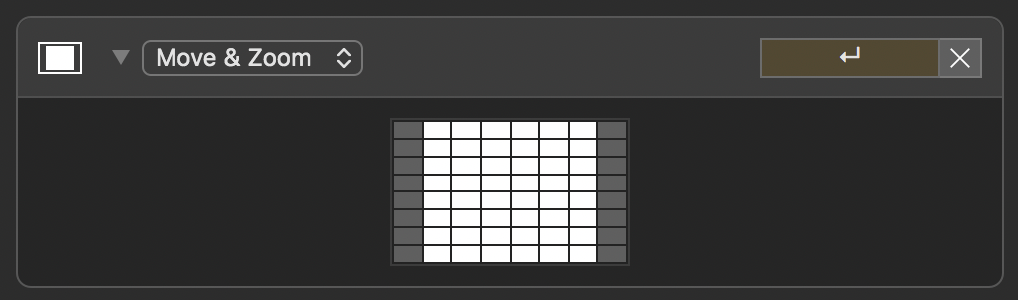
Zen layout
Even with so much productivity and multi-tasking gains from your default layout, sometimes you just want to focus on one thing at a time. Now, you could take an app fullscreen, but dealing with a big display the contents of that window can look weird or unappealing.
What I call a zen layout is really just a combination of two things:
A hotkey to center a window and give it just the right width so the content inside of it doesn’t look weird.
Hide everything else with the Mac’s standard shortcut Option + ⌘ +
H
In Moom, a setting for my zen layout looks like this:
So now I can trigger this configuration with Control + ↑ + ↵ Enter.
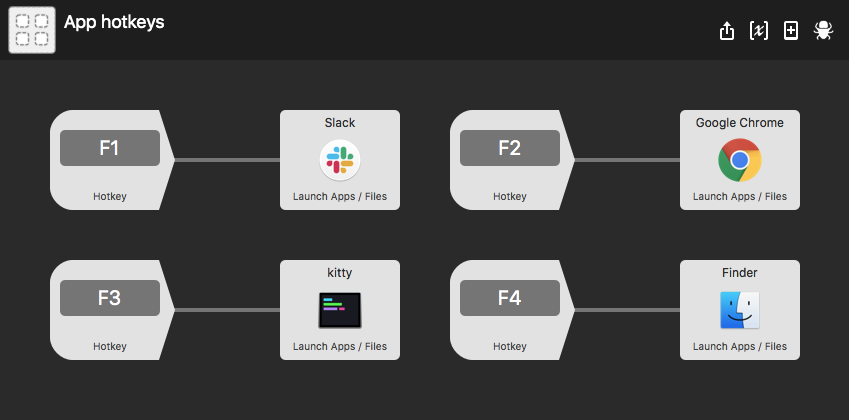
Launch or switching apps with hotkeys
Using ⌘ + Tab should not be your main way to move between apps. The order of the list changes constantly, and you waste time moving around in order to find the app you want.
Instead, give your most accessed apps a hotkey. This way, you’ll know exactly what app is opening and it will become second nature. These are my hotkeys:
Communications (Slack): F1
Internet browsing (Chrome): F2
Main work tool (kitty): F3
File management (Finder): F4
Communications (Messages): F5
Communications (WhatsApp): F6
I use function keys because they’re close to me on the keyboard and the number roughly matches their location on screen, but please choose something that is comfortable and convenient to you, otherwise you won’t stick to it.
To setup these hotkeys, I made an Alfred workflow (below) but you can get similar results with a tool like BetterTouchTool.
Alfred Workflow
A very important point here is to make sure triggers are executed instantly:
If you don’t do this, you will be waiting about a second to access each app.
Use ⌘ + Space and type the first three or four letters of less common apps instead of using ⌘ + Tab. Trust me, it’s faster. Not to mention it’s the same command you can use to open for files or folders; or to perform other quick actions.
Centralizing the Finder window
If you’re like me and have a hotkey to focus on the Finder window and also allocated a dedicated space for it in your default layout, I strongly suggest you make tabs the default behavior for it.
What this means is that whenever you reveal a file or folder on Finder (via Alfred, Spotlight, etc.) they will now open on a new tab on the same window you already have open. You’ll never have to go dig for multiple Finder windows again.
All you have to do is open your Dock settings on System Preferences:
This setting will ensure that whenever you open folders using Alfred, your terminal or code editor it is done in a predictable location
Minimal aesthetics
Make room for beautiful wallpapers by getting rid of noise on your screen.
No desktop icons
Every time you need to grab something from your desktop, it means you have to move windows to the side and waste time looking for where things are. A computer is supposed to help us find things easily. Access your Desktop through your central Finder window instead.
Unfortunately, there isn’t a way to hide your Desktop icons through any settings. So you’ll have to run some commands on your terminal:
defaults write com.apple.finder CreateDesktop -boolfalse&& killall Finder
One-liner to hide icons
defaults write com.apple.finder CreateDesktop -booltrue&& killall Finder
One-liner to undo this.
No dock
My Dock preferences pane. Notice “Automatically hide and show the Dock”.
Some people like to have the dock to the side (a la Ubuntu). I prefer to not see it. I don’t really need to see what apps are open, I already know.
No menu bar
My General preferences pane. Notice “Automatically hide and show the menu bar”.
Similarly, I always know which app I’m on, and I’m aware of most of the keyboard shortcuts I need the majority of the time, so no need to see this information either. The menu bar is always there if I need it by using option+cmd+d or hovering to the top of the desktop.
Wrapping things up
Hopefully these tips make your life a bit easier. A partying piece of advice is to always experiment with new layouts and configurations until you find one that works for you. I used to prefer working on my smaller laptop screen until I took the time to explore my options with larger displays and multiple monitors. Only then did I realize how much more productive I could be.
I love looking at faces. In the subway, in movies, etc. And if you spend enough
time with me, you’ll hear me make weird comparisons like “this person looks
like this other person”.
I wanna say that I get my look-alike observations pretty close, but I’ve always
wanted to actually take the time to visually corroborate. Seeing this
dopplegänger photography project definitely scratches that itch.
In USWS, also known as asymmetric slow-wave sleep, one half of the brain is in deep sleep, a form of non-rapid eye movement sleep and the eye corresponding to this half is closed while the other eye remains open.
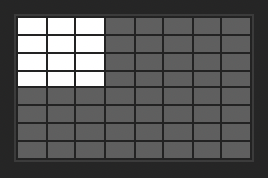
 I used a 8x8 grid to help create the right proportion. E.g. I needed my browser to be a bit wider than half the screen.
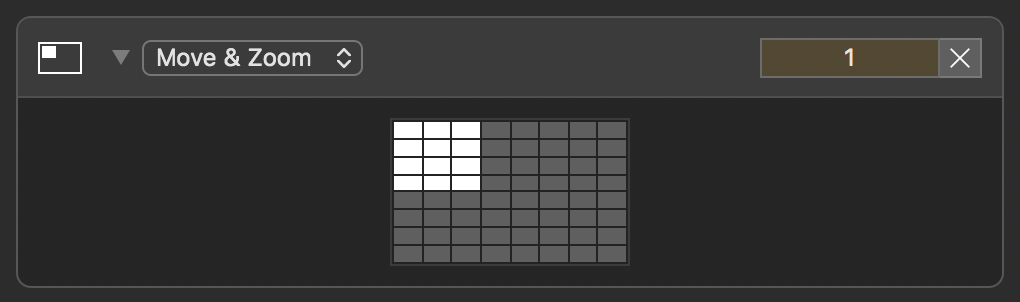
 For area 3, I use Control + ↑ + Space. This is a default hotkey from Moom to occupy the entire screen.
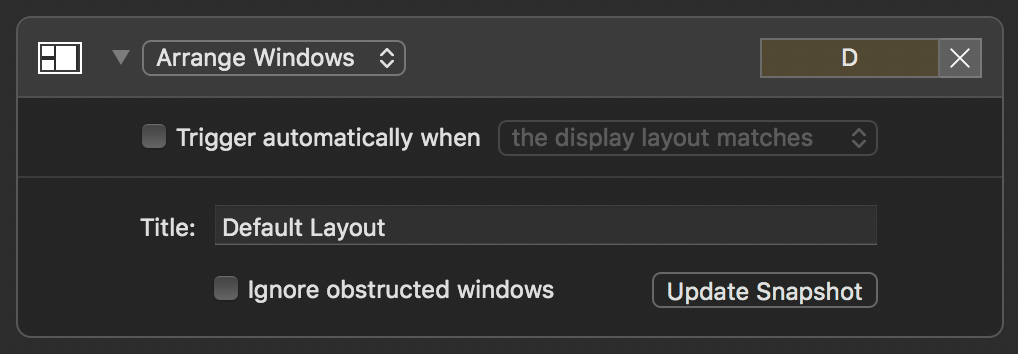 “Ignore obstructed windows” is checked by default, but I kept it on because I want other communication tools to be moved as well (even if they’re not visible)
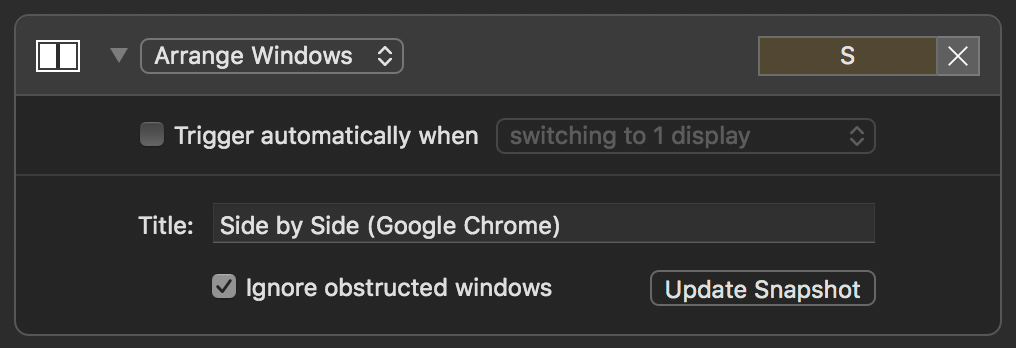 In this case, I do want to Ignore obstructed windows because I only care about the windows visible.
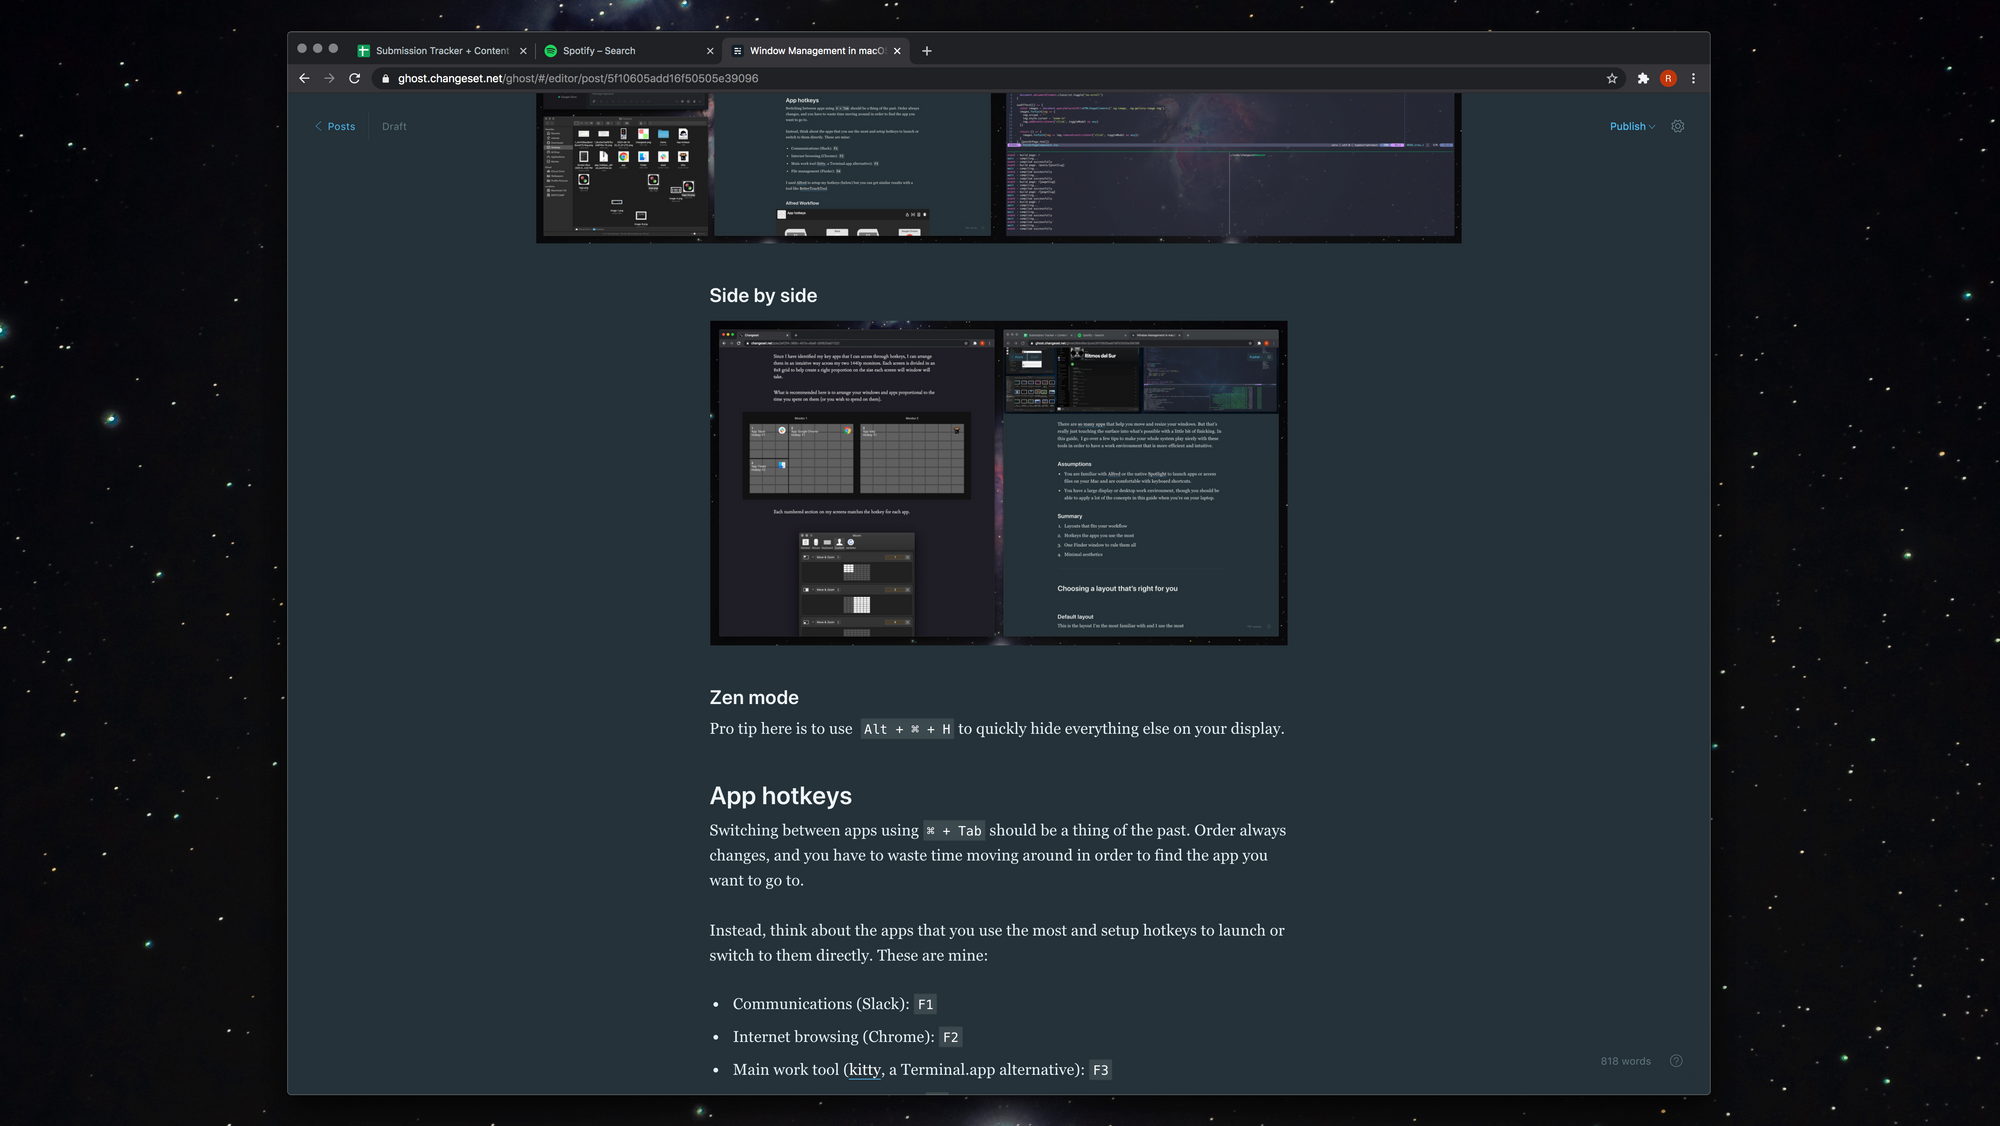
 If you don’t do this, you will be waiting about a second to access each app.
 This setting will ensure that whenever you open folders using Alfred, your terminal or code editor it is done in a predictable location
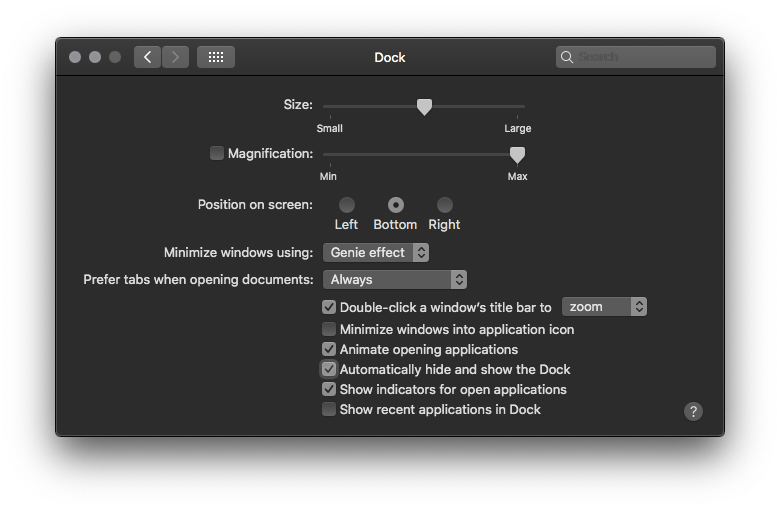 My Dock preferences pane. Notice “Automatically hide and show the Dock”.